Easy sourdough focaccia with an overnight rise … no kneading, no stretch and folds, no shaping. Step-by-step tips for big bubbles, crisp edges, and perfect dimples.
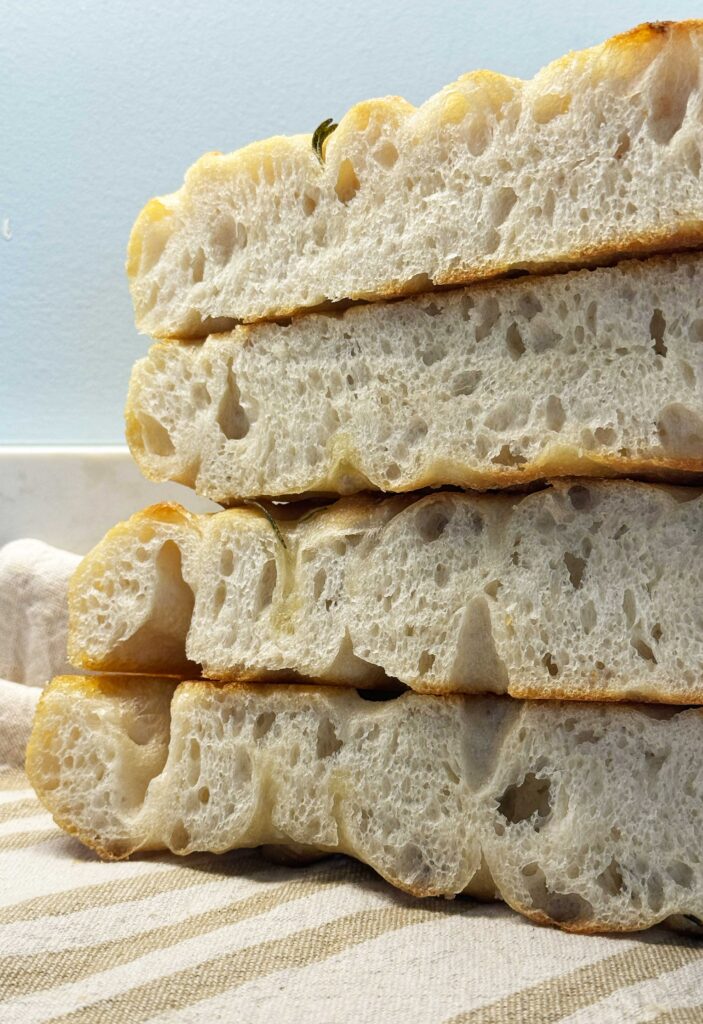
This easy sourdough focaccia bakes up with a crackly, olive-oil crust, crispy edges, and a soft, airy, bubbly crumb. You stir together bread flour, water, salt, and a little active sourdough starter, let the dough rise slowly (same day or overnight), then dimple it into an oiled pan and bake. It is one of the most forgiving sourdough recipes I make!

I keep a sourdough starter going on the counter all the time here at the farm, and we bake some version of sourdough every week. Focaccia became my favorite “I have starter and not much of a plan” bake, because it asks so little of you. There is no shaping, no scoring, and no special equipment. Just a bowl, a pan, and a little patience while the dough does the real work. If you have made my easy sourdough bread for beginners, you already have every skill you need for this (and it’s even easier). If you haven’t yet, focaccia is an excellent first sourdough recipe!
What you’ll need before you start:
- An active, bubbly sourdough starter (more on what “active” means below)
- A 9×13 metal pan (or see the scaling section for an 8×8)
- Good olive oil and a little flaky salt
That’s really it. If your starter is sleepy or you only have a smaller pan, don’t worry, I’ll walk you through both.
Ingredient Notes and Substitutions
Focaccia is a short ingredient list, so each one earns its place. Here is what I reach for and why, plus a few swaps for when you’re working with what’s in the pantry.

Bread flour. I use bread flour for focaccia because the higher protein gives you a stronger dough that can hold all those big, open bubbles. You can use all-purpose flour in a pinch, and it will still taste wonderful, but the crumb will be a little tighter and less chewy. If that’s what you have, use it and enjoy it.
Whole Wheat Swap

If you’d like a little more flavor and a heartier crumb, you can replace about 10 to 20 percent of the bread flour with whole wheat. Whole wheat drinks up more water, so when you make this swap, add roughly 2 to 5 percent more water if the dough feels stiff or tight. Be careful not to go much higher than 20 percent for your first try, because too much whole wheat can pull the crumb dense and dry, and the dough tends to ferment a touch faster too. Start small, see how you like it, and build from there.
Olive oil. This is not the place to skimp. The oil is what gives focaccia its signature fried-crisp bottom and golden top, so use one you actually like the taste of. I specifically use a regular olive oil, not extra virgin olive oil, because the flavor is more mild and highly neutral, and it has a higher smoke point (up to 470°F) and thus less likely to burn the top of my dough. Regular olive oils tend to be better for baking for these reasons. You’ll oil the pan generously and drizzle more right over the dimples before baking.
MEASURING Tip

I give this recipe in grams first, and I really hope you’ll weigh your ingredients if you can. Cups are fine for a lot of baking, but for a high-hydration dough like focaccia, a few grams off in either direction changes how the dough handles. A simple kitchen scale takes the guesswork out of it.
How to Get a Sourdough Starter for This Recipe
If you’re brand new to sourdough, this is the part to slow down on, because almost every disappointing focaccia traces back to a starter that wasn’t quite ready. You have a few easy ways to get one going. You can make your own from just flour and water (it takes about a week, and I walk through the whole thing in my sourdough starter guide). You can buy dehydrated starter online and rehydrate it. Or, my favorite, you can ask a friend or a local bakery for a small scoop of theirs. Sourdough people love to share.
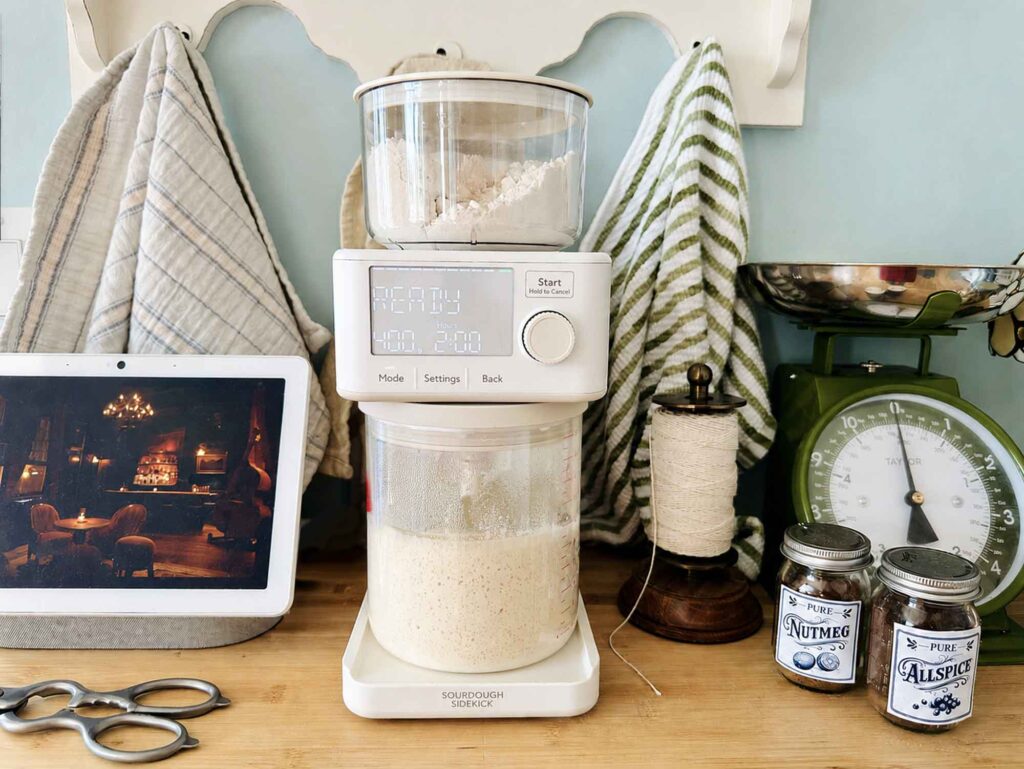
Another idea is to get yourself a Sourdough Sidekick and let it create and maintain a starter for you (I recently bought one and have already fallen in love with how easy it makes it). Here is my Sidekick in action in my kitchen, with a fresh batch of starter it had ready and waiting for me so I could make this focaccia. (And no, no one paid me to tell you how awesome this device is … I’m just super excited about it!!)
However you get it, the real question is whether it’s active when you mix your dough. Here’s what active looks like: your starter has roughly doubled within about 4 to 8 hours of its last feeding, and it’s bubbly all the way through.

An active starter may also pass the float test (drop a small spoonful in water and it floats).

It’s best to use starter right around its peak, when the domed top is just barely starting to flatten. This helps because a starter at its peak has the most lifting power, and that lift is exactly what turns flat dough into airy focaccia. If your starter is flat, sluggish, or smells sharply of nail polish, give it a feeding or two and wait. It’s worth the extra day.
How to Make Sourdough Focaccia (Step-by-Step)
We’re really making this in two stages: a long, slow overnight rise that builds all the flavor, then a shorter rise in the pan right before baking. I’ll walk you through each step, and I’ll tell you exactly what to look for so you’re never guessing. The full measurements live in the recipe card below, so think of this as the why behind each move.
Step 1: Make the Dough (what it should look like)
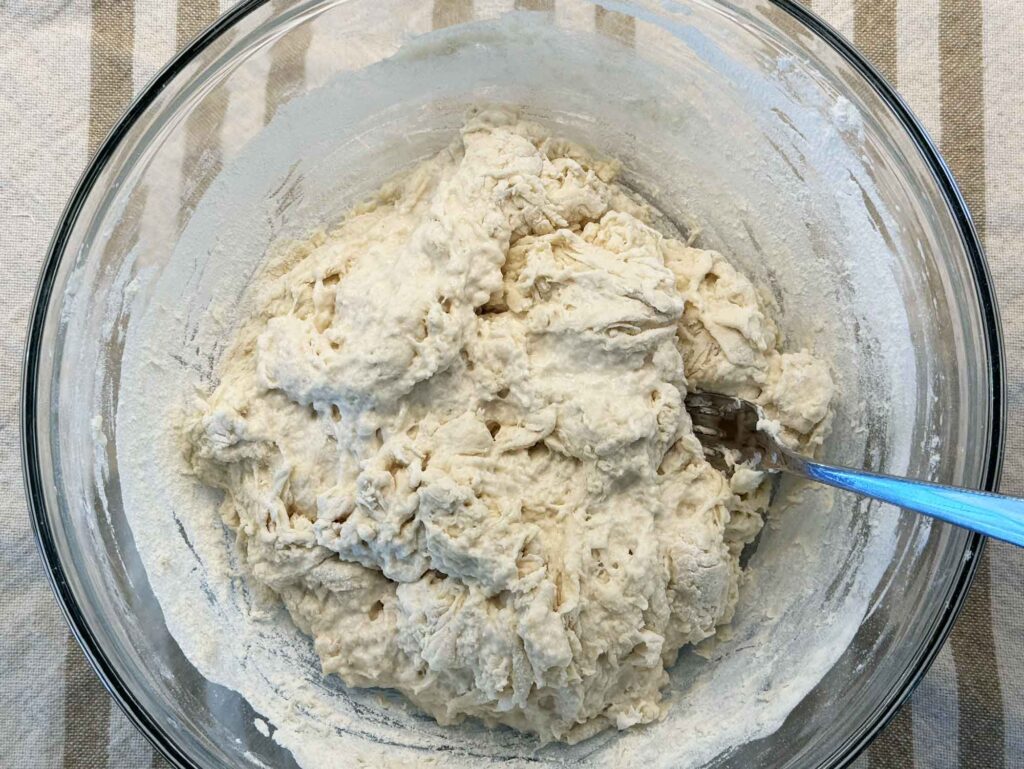
In a big bowl, stir your active starter into the water until it’s milky and loosened up. Add the bread flour and salt, then mix with a sturdy spoon or your hand just until there’s no dry flour left. It will look shaggy, sticky, and frankly kind of ugly at this stage, and that is totally normal. Cover the bowl and let it rest about 30 minutes. Then, with a wet hand, form it into a ball and transfer it to a large, lightly oiled bowl.
WHY NO STRETCH & FOLDS?

If you’ve made sourdough before, or are familiar with other focaccia recipes, you may notice that I am not recommending any “stretch and folds” for gluten development. That’s because I don’t think they are needed for focaccia. I tested loaves with and without them, and the ones without them had better crumbs. That’s all the proof I need that it’s not necessary with sourdough focaccia. But if you really want to do them, it also should not hurt it – just limit it to no more than a couple.
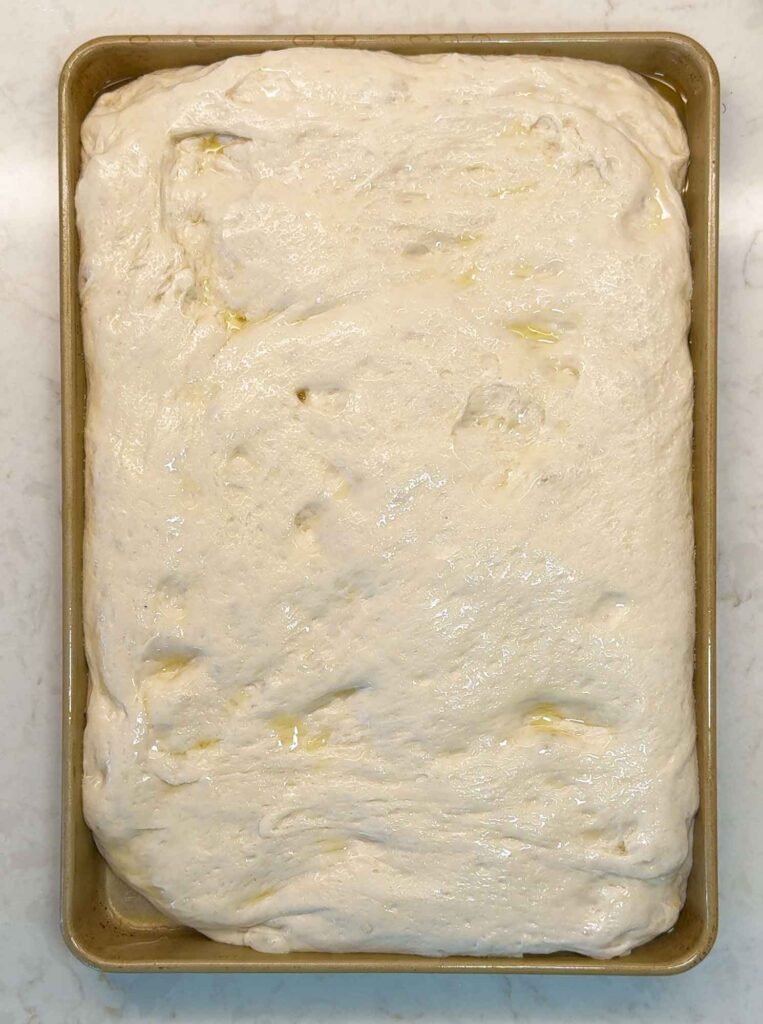
Step 2: Bulk Fermentation (target rise and bubbles)
Now comes the bulk fermentation, which is just the long first rise where the dough develops its flavor and structure. Cover the bowl and let it rise until it’s grown by about 50 to 100 percent and you can see bubbles forming on the surface and around the edges. In a cool kitchen this happens overnight; in a warm one it’s faster. My best tip is to let it sit on your counter for a few hours, then put it in the refrigerator overnight … this not only improves the flavor, but it slows the rise and makes it more reliable.
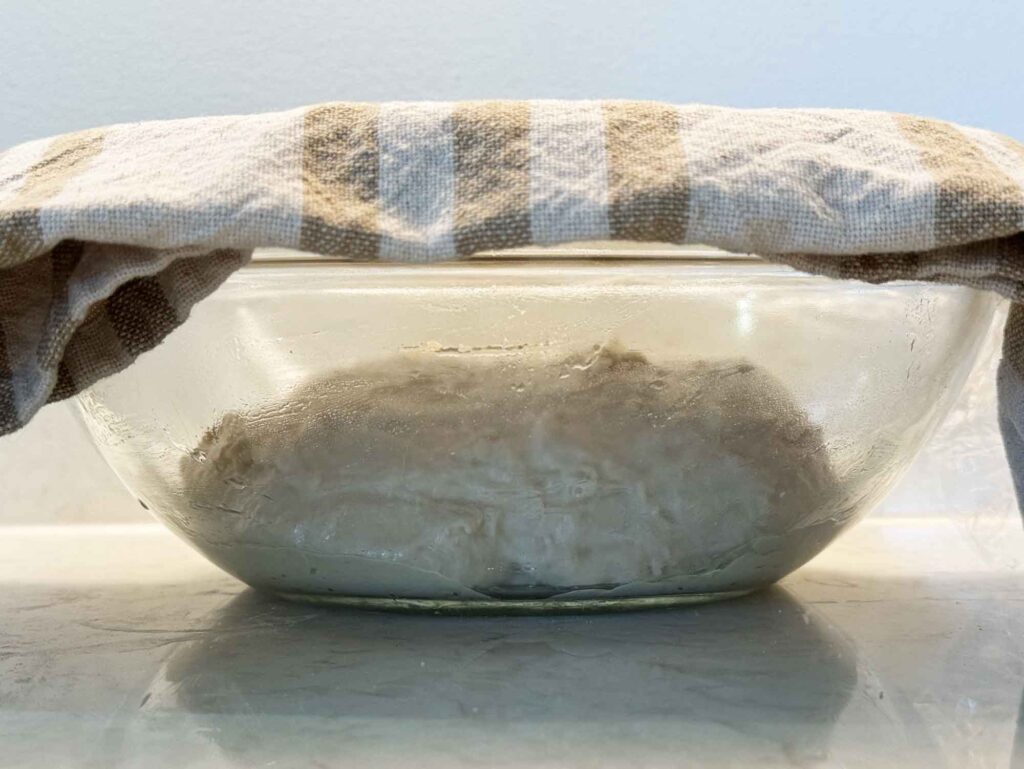
Here is my sourdough focaccia dough ball on the counter right after placing it in the oiled bowl:
And here it is after its bulk fermentation in the refrigerator overnight:
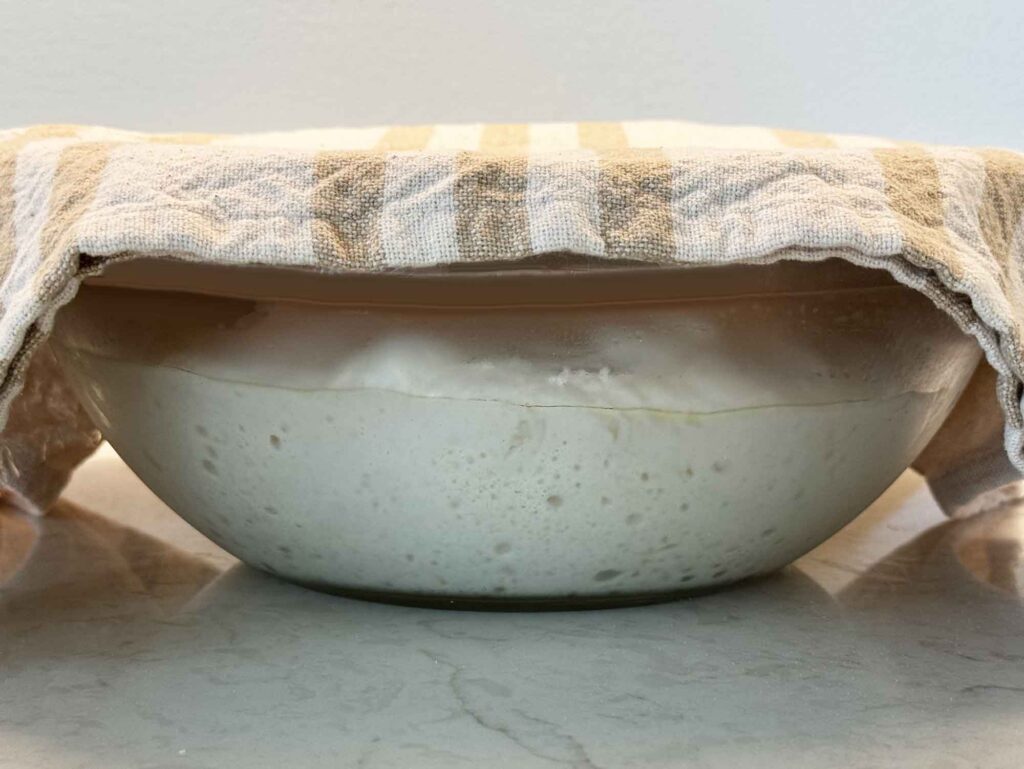
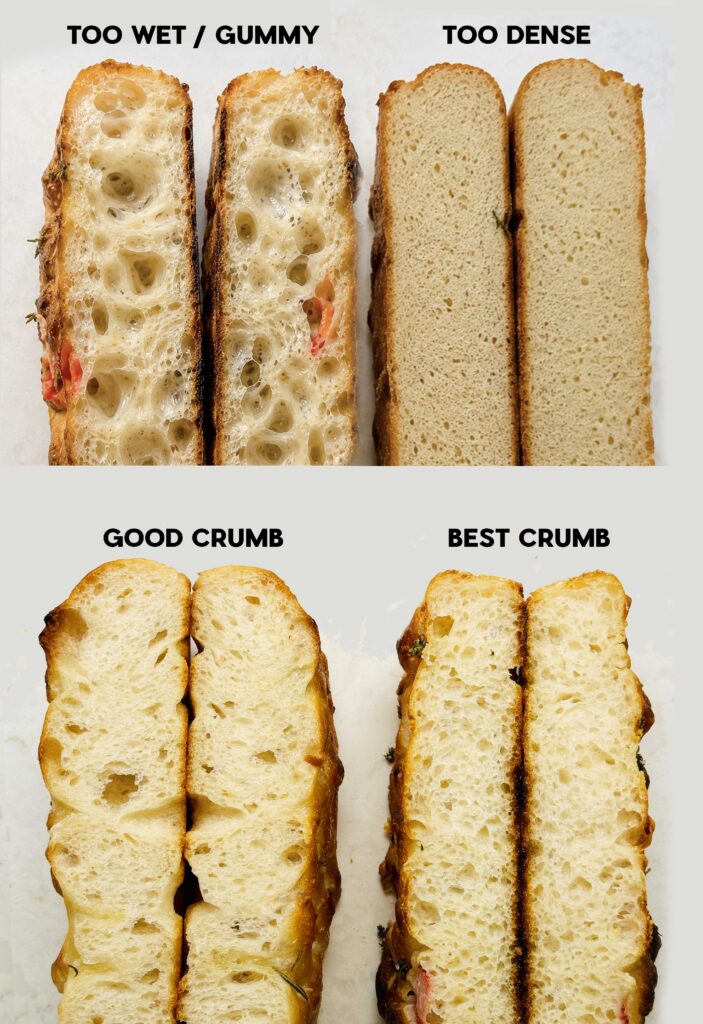
The single most helpful thing I can tell you here is to trust what you see over what the timer says. A puffy, jiggly, bubbly dough is ready whenever it gets there. One common mistake is letting bulk go too far, until the dough is slack and soupy and smells boozy, which gives you a flat, gummy focaccia. When in doubt, stop a little early.
Step 3: Second Rise in the Pan (finger-dent cues)
Pour a generous couple of tablespoons of olive oil into your 9×13 pan and spread it all over the bottom and up the sides. Gently tip the dough into the pan, then turn it once so both sides get coated in oil. Stretch it toward the corners as much as it will easily go. It will spring back, and that’s fine, just let it relax. Cover the pan and let it rise again until it looks puffy and pillowy and fills the pan, usually 1.5 to 5 hours depending on your kitchen.
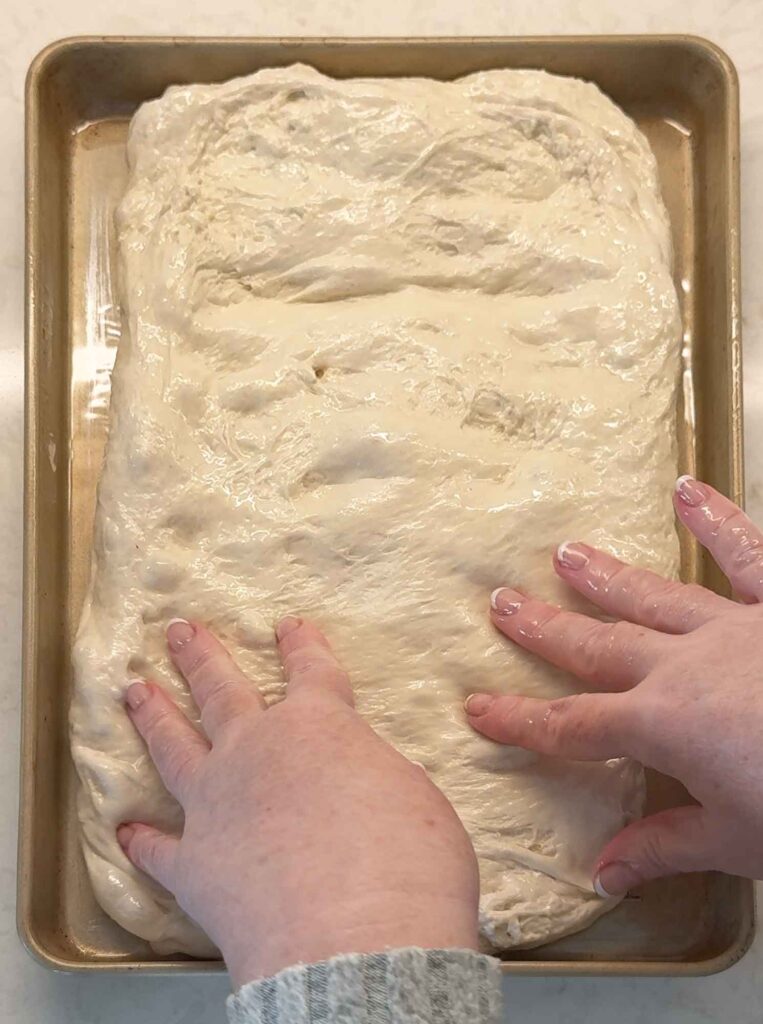
To test it, oil a finger and gently poke the dough. If the dent springs back slowly and leaves a little dimple, it’s ready. If it springs right back fast, give it more time.
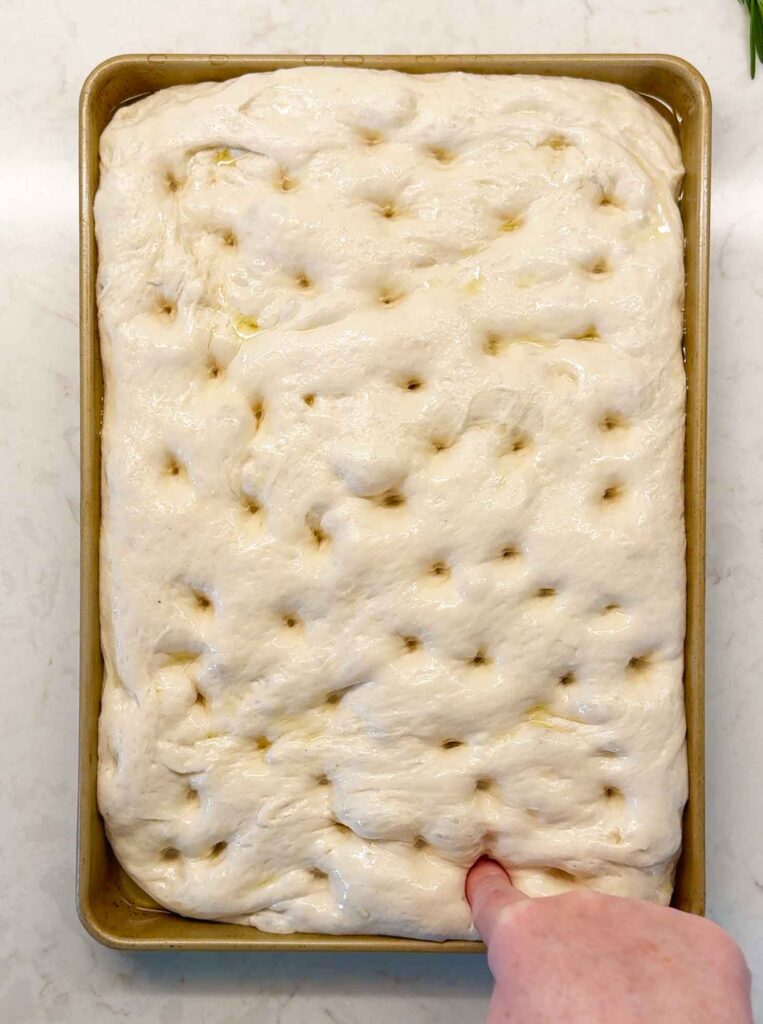
Step 4: Dimple and Top
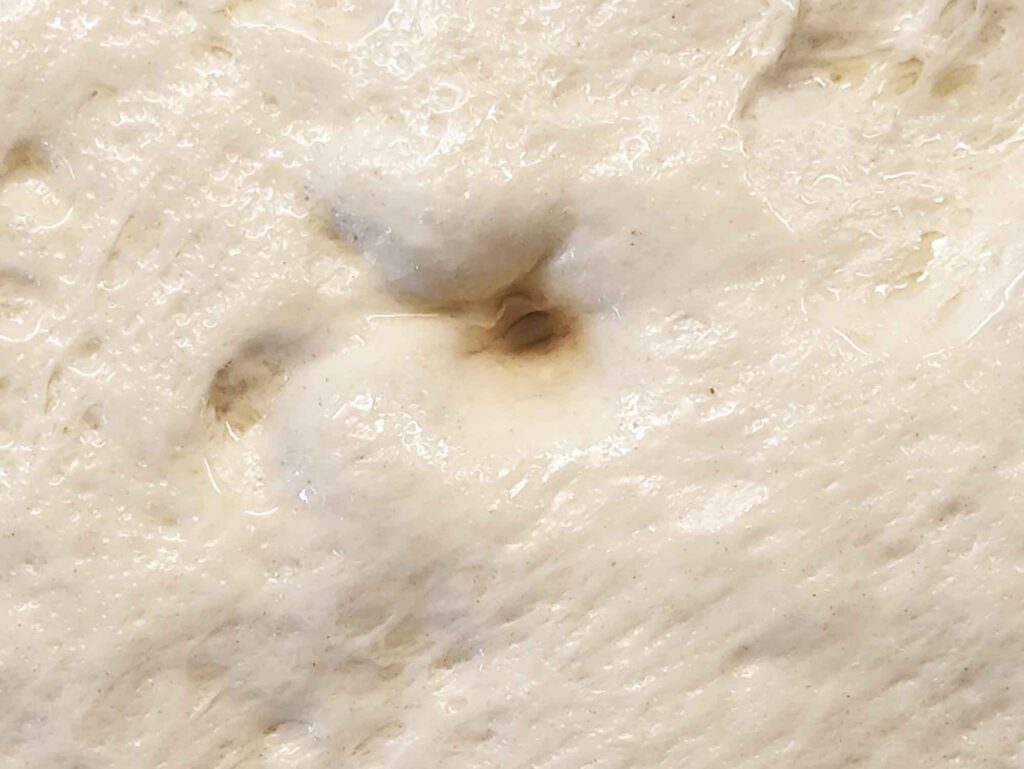
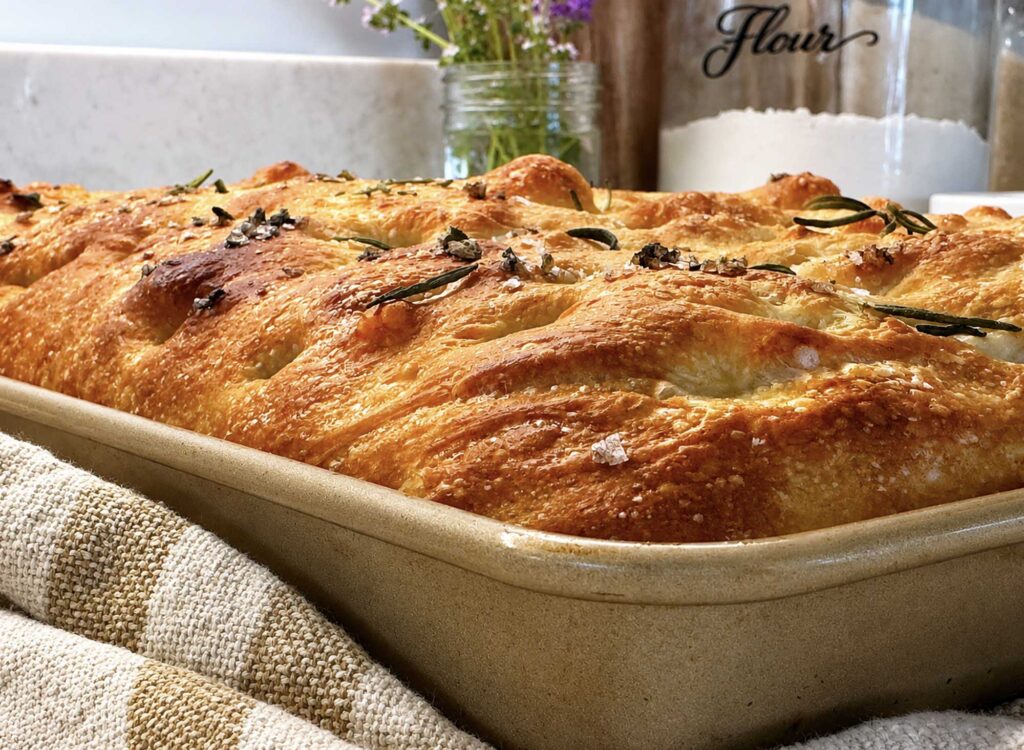
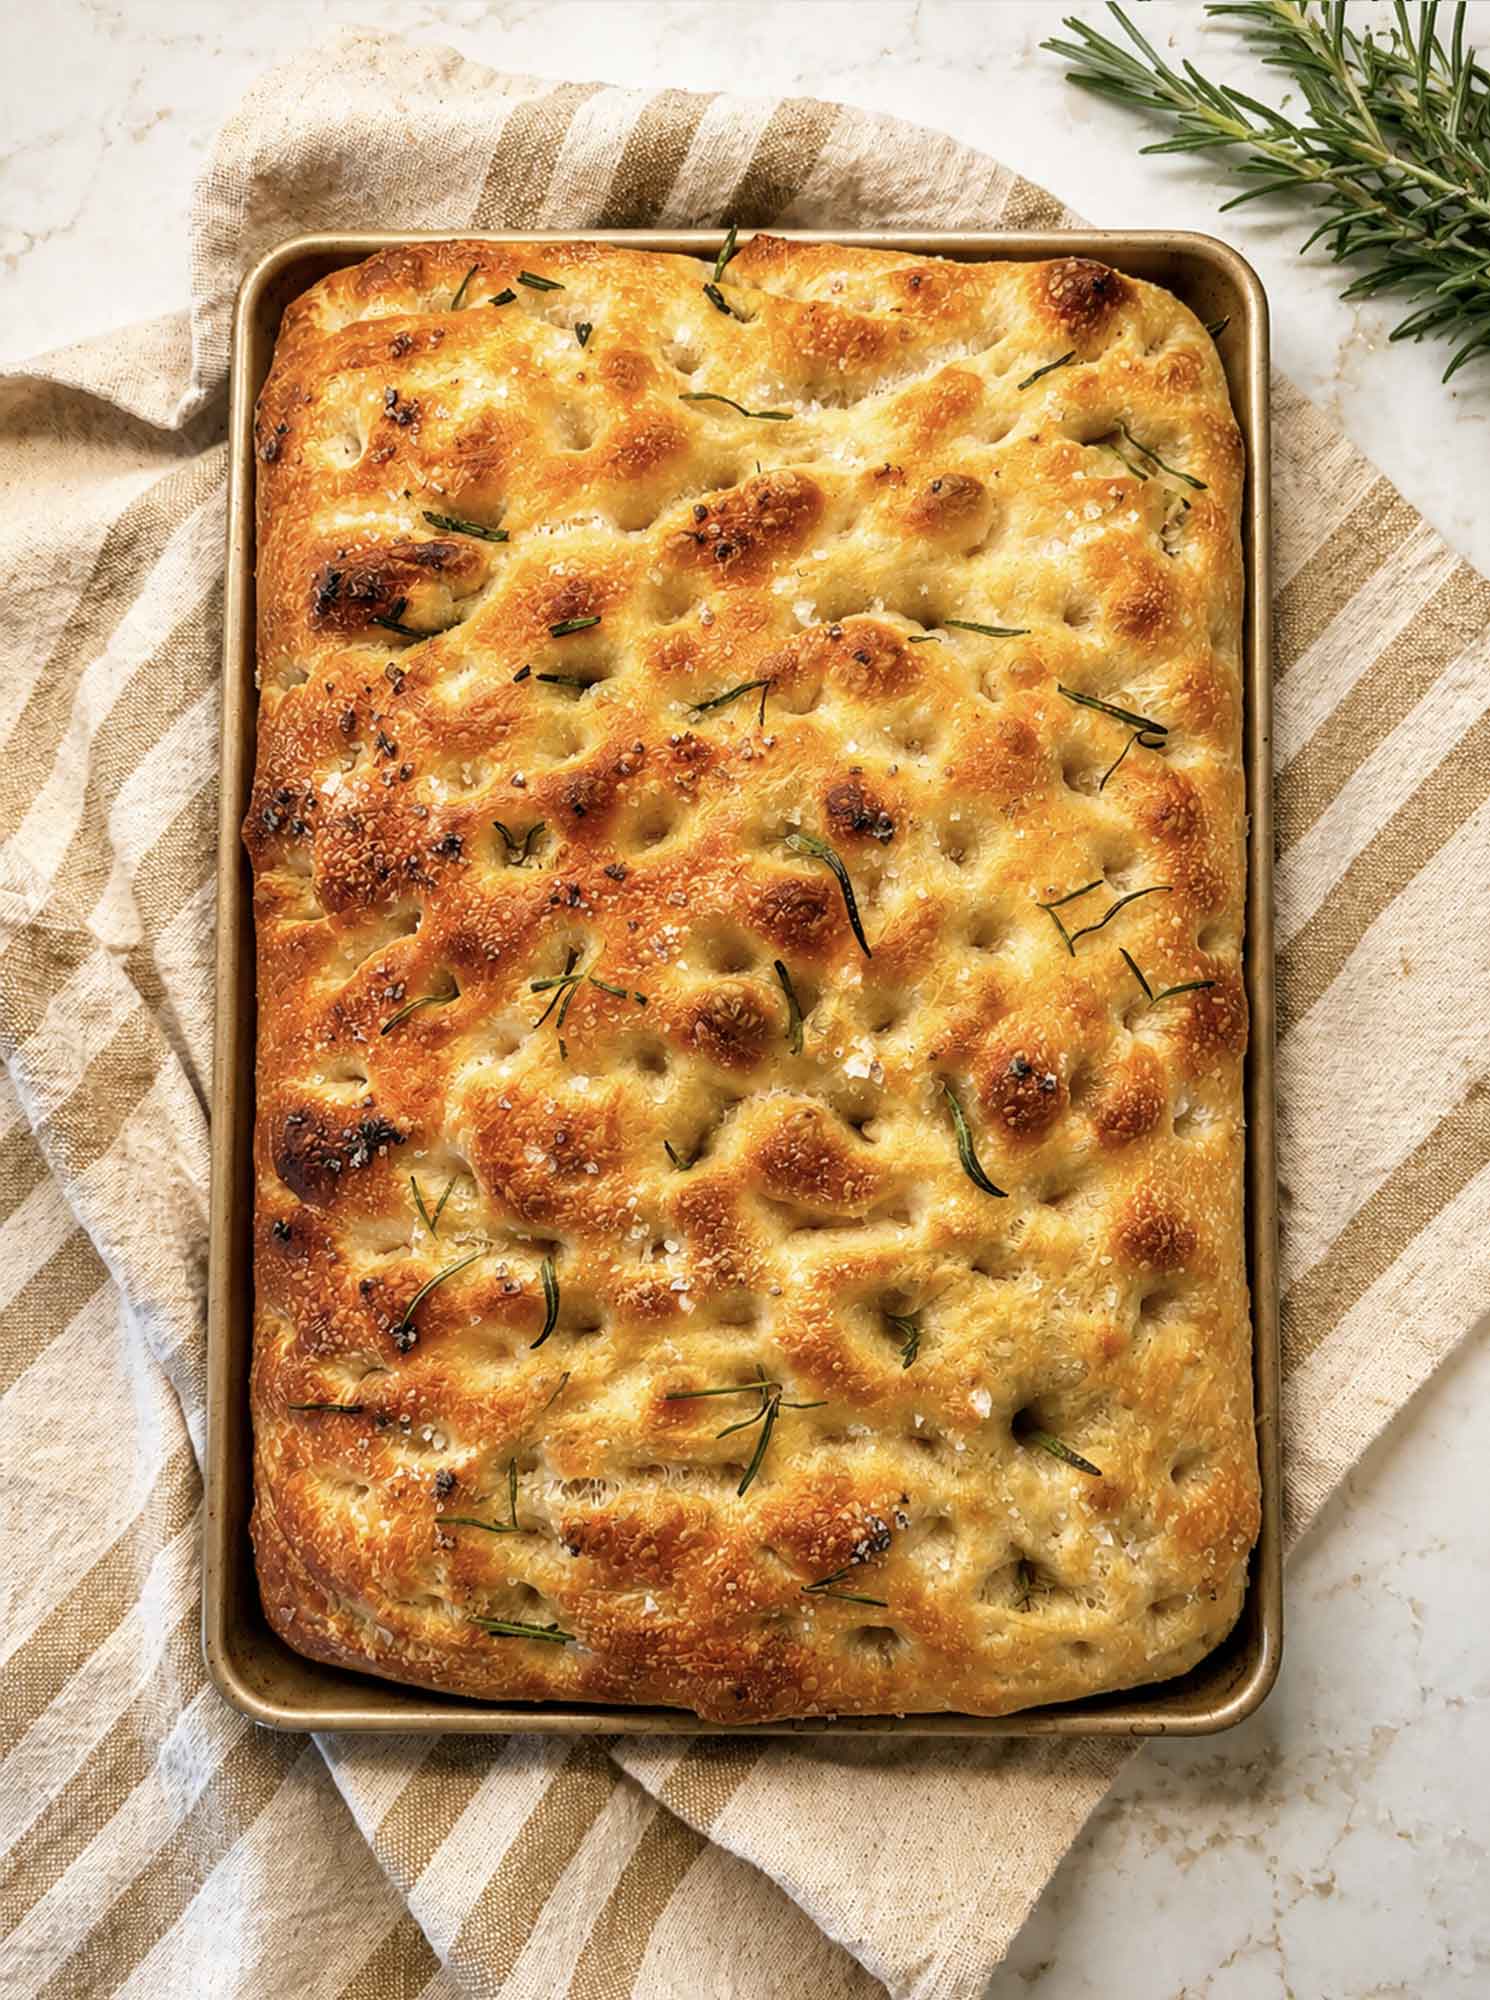
This is the fun part. Drizzle more olive oil over the top, then press straight down with oiled fingertips, all the way until you can feel the bottom of the pan. Make deep dimples all over, like you’re playing the piano. Don’t be shy here. Those pockets hold the oil and give focaccia its character.
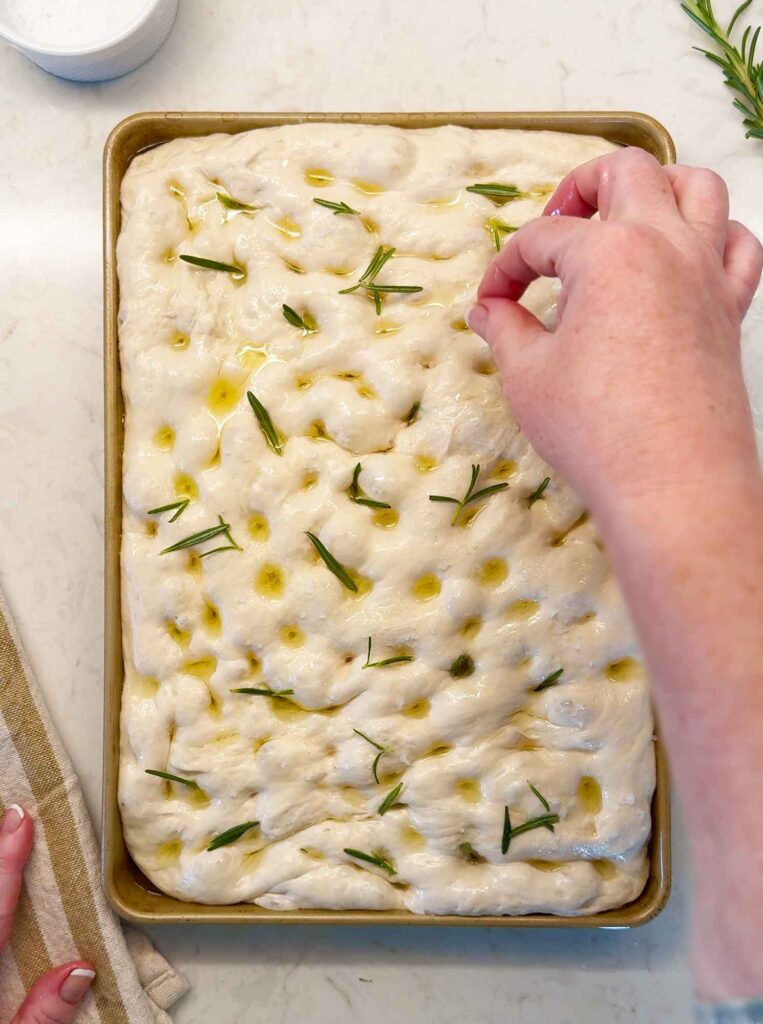
If you’d like, scatter on flaky salt and a little fresh rosemary now (more on toppings further down).
So how hard should you press?
And why do the dimples sometimes bounce back?
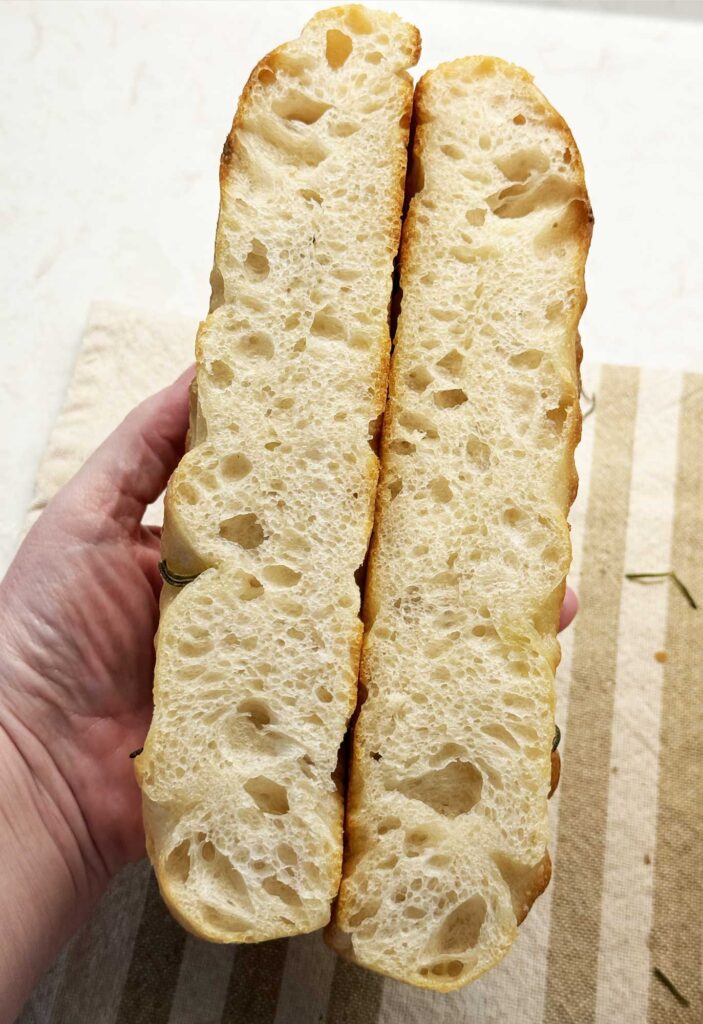
Press firmly enough to feel the pan under the dough. When you remove your finger, the dough should stay dimpled. If the dimples keep rebounding, the dough is probably a little under-proofed or the gluten is still tight, so just let it rest another 20 to 30 minutes and dimple again. Ready-to-bake dough looks jiggly, with visible bubbles at the edges and a gently domed surface.
Step 5: Bake (doneness cues)
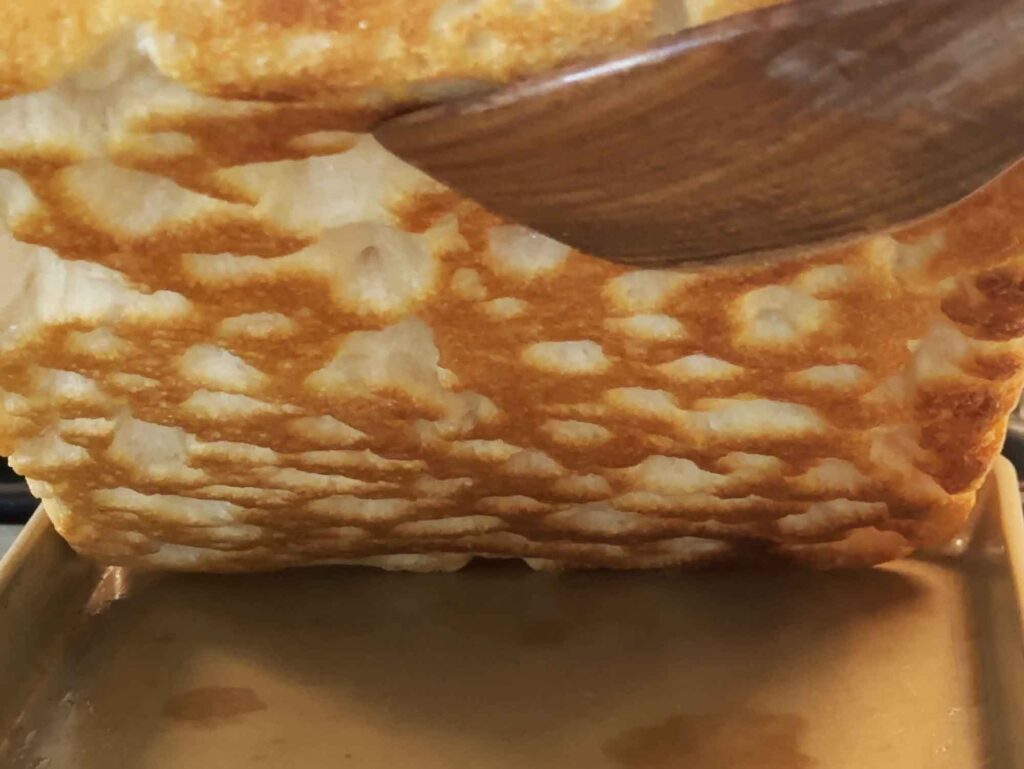
Bake in a fully preheated 425°F oven until the top is deeply golden and the edges look crisp and lacy, about 22 to 27 minutes. The smell will tell you you’re close. For the best bottom crust, you can set the pan on a lower rack for the first half of the bake (or move it there halfway through if you feel like the top is getting brown fast). When it’s done, the focaccia should slide around in the pan when you give it a little shake, and the bottom should be golden and crisp when you peek under a corner.
Kitchen Tip
If you find the focaccia seems stuck in your pan, you may need a slightly longer bottom bake. If the bottom is a little pale or soft, it tends to cling. A deeper golden bottom releases better. If this continues to happen in future loaves, try a piece of parchment paper top-coated with olive oil in the bottom of your pan.
Let it cool in the pan for about 5-10 minutes, then loosen the edges and remove it while still warm. If it sits too long, steam can soften the bottom and make it cling more. Place it onto a rack to cool off, so the bottom stays crisp. Feel free to eat as soon as you can. It is SO GOOD warm.
Timing and Scheduling (cool kitchen vs warm kitchen)
The thing that trips up most new sourdough bakers isn’t the mixing, it’s the timing, because fermentation speeds up or slows down with your room temperature. So here are two sample schedules to take the anxiety out of it. Use the one closest to your kitchen, and remember these are starting points, not rules.
| Step | Cool kitchen (66 to 68°F) | Warm kitchen (72 to 75°F) |
|---|---|---|
| Mix the dough | 7:00 pm | 8:00 am |
| Bulk fermentation | Overnight, 10 to 14 hours | 6 to 10 hours (still okay to put in the refrigerator overnight) |
| Pan rise (second rise) | 3 to 5 hours | 1.5 to 3 hours |
| Bake | Late morning | Late afternoon |
NEED TO DELAY BAKING?

Life happens, and sourdough is patient. After the bulk rise, you can cover the dough and refrigerate it for up to 24 to 48 hours. When you’re ready, bring it to room temperature, finish the pan rise, then dimple and bake as usual. The cold rest actually deepens the flavor, so this is a feature, not a compromise. Here’s my one rule-of-thumb line to keep in your head: watch the dough, not the clock. Aim for visible bubbles, a jiggly dough, and that 50 to 100 percent rise depending on your method, and you’ll be in good shape.
Pan Sizes and Scaling
This recipe is written for a 9×13 pan, which gives you a nice medium-thick focaccia. But you can absolutely scale it for the pan you have, and you’ll mostly do that by adjusting how much dough goes in. Here’s a simple way to think about it.
| Pan size | Approx. area | Dough to use | Notes |
|---|---|---|---|
| 9×13 | 117 sq in | Full recipe | Medium-thick, the default here |
| 8×8 | 64 sq in | About 55% of the dough | Same thickness, smaller batch |
| 8×8 (full dough) | 64 sq in | Full recipe | Thick, bakery-style; expect a longer bake |
The math is friendlier than it looks: an 8×8 pan is about 55 percent of the area of a 9×13, so using a little over half the dough gives you the same thickness. Or keep the full batch in the 8×8 for a thick, pillowy focaccia, and just know it will need more time in the oven. Whenever you change the thickness, lean on doneness cues instead of the clock.
Glass vs metal pans. I reach for metal because it crisps the bottom best, but glass works too with one small adjustment. Glass holds and reflects heat differently and can over-darken the bottom, so lower your oven by about 25°F and start checking early, and it helps to set the pan on a higher rack. Whatever pan you use, oil it generously, because sticking is the one failure that can ruin an otherwise perfect focaccia. For extra insurance you can line the pan with parchment, though you’ll trade a little of that fried crispness for an easier release. Whatever works for you.
Focaccia Toppings and Inclusions
Plain focaccia with just oil and flaky salt is honestly hard to beat, but this is a wonderful canvas. The trick is knowing the difference between toppings (things that sit on top) and mix-ins (things folded into the dough), and when to add each so nothing burns or falls off.
Mix-ins like shredded cheddar or chopped jalapeño are best folded in gently after the bulk rise or as you transfer the dough to the pan, so you don’t tear all that lovely structure.
Toppings like fresh rosemary and flaky salt go on right after you dimple, just before baking. For things that scorch easily, like sliced garlic or thin onions, add them right before baking and tuck them down into the dimples with a little oil to protect them. Caramelized onions are best added near the end of the bake. Be careful not to pile toppings on too early or too high, because that’s the fastest way to end up with bitter, burnt bits on top of an otherwise gorgeous loaf.
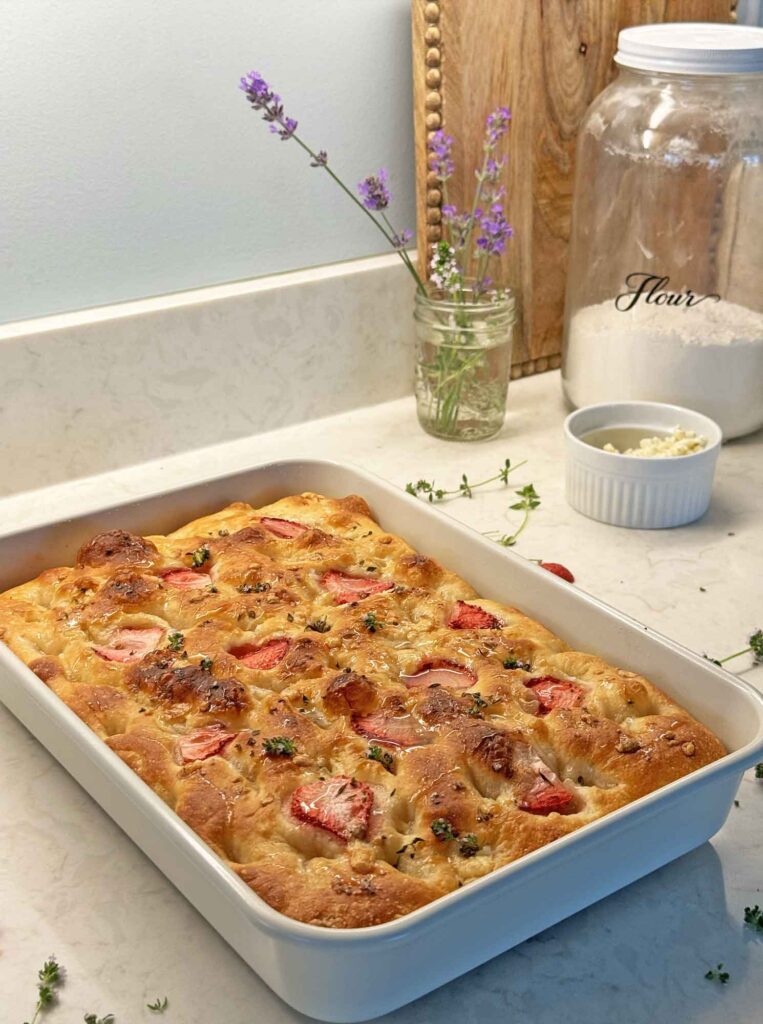
Here’s a sourdough focaccia I topped with sliced strawberries, fresh thyme, and blue cheese, adding a drizzle of honey after it baked.
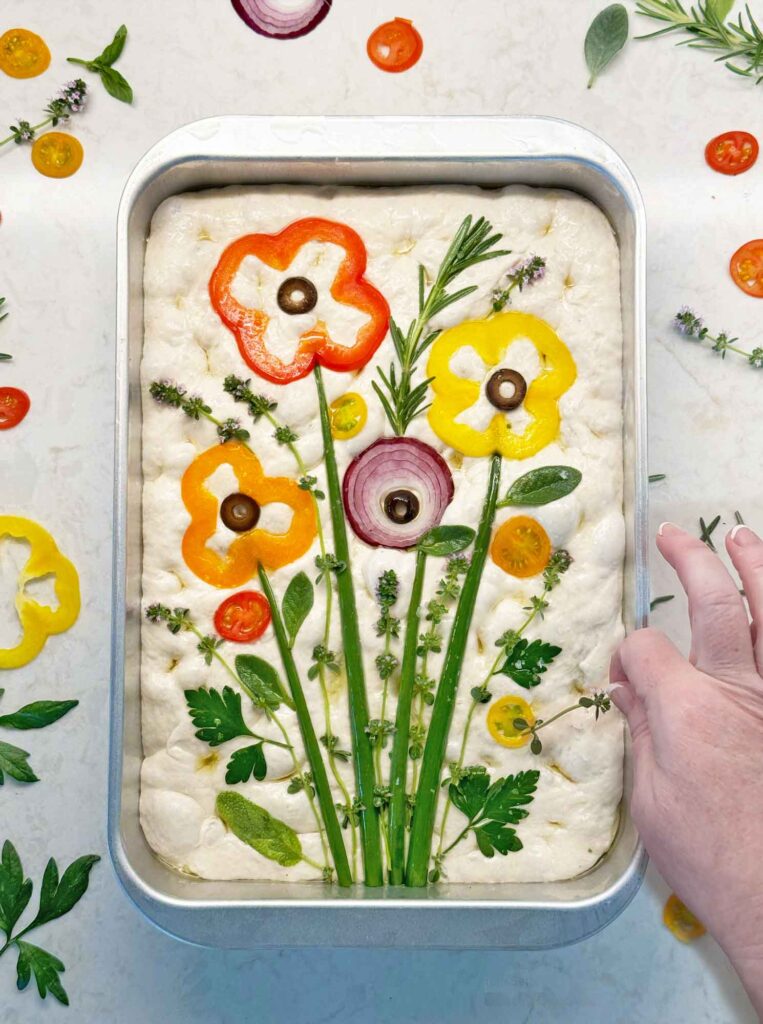
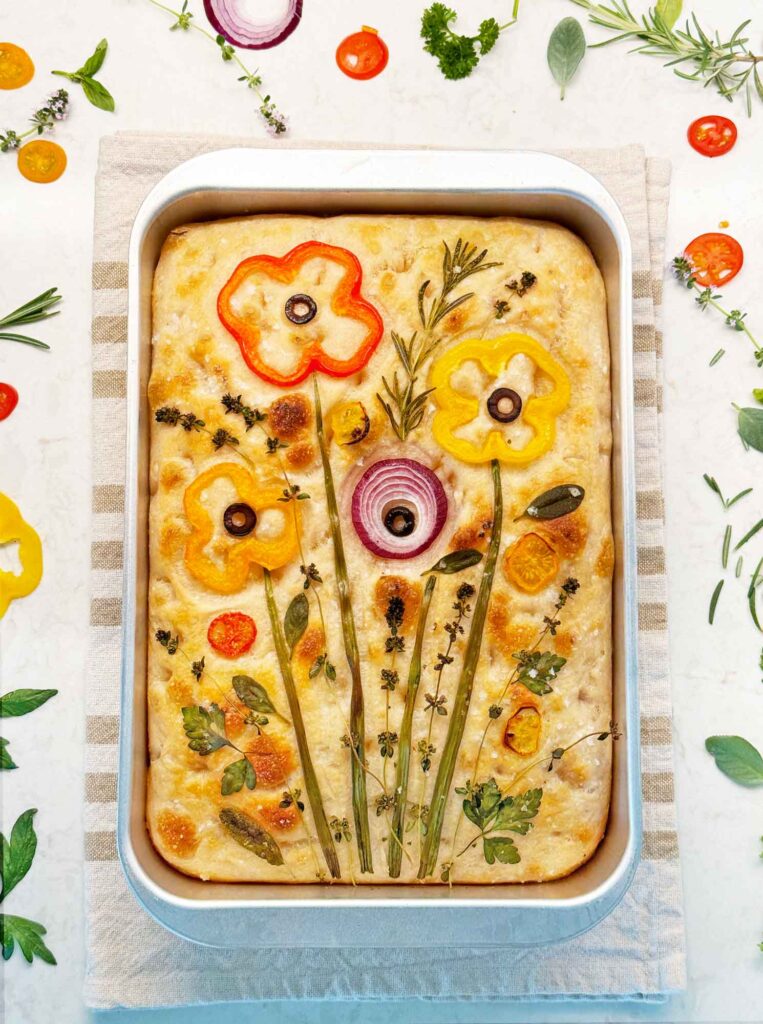
And, for my fellow creatives, you can make focaccia art, too! It’s like a blank canvas for your imagination.
Make-Ahead, Storage, and Reheating
Focaccia is genuinely best the day it’s baked, but it stores and reheats well, and you can even bake most of it ahead. Here’s how I handle leftovers and planning.
To store: Keep cooled focaccia in an airtight container or bag at room temperature for up to 2 days. For anything longer, freeze it.
To reheat: Skip the microwave, which turns it rubbery. Instead, warm slices in a 350°F oven for a few minutes until the crust crisps back up. It comes back to life beautifully.
To par-bake and freeze: This is my make-ahead trick. Bake the focaccia until it’s just set and pale golden, about 60 to 75 percent of the full bake time, then cool it completely, wrap it well, and freeze. When you want fresh focaccia, bake it straight from frozen at the full temperature until it’s deeply golden and crisp. One small safety note: don’t leave par-baked bread sitting out at room temperature for long stretches. Refrigerate or freeze it for storage, then re-crisp it in a hot oven when you’re ready.
Troubleshooting Sourdough Focaccia
Even good bakers hit snags, so let’s head off the most common ones. If your focaccia didn’t turn out the way you hoped, the fix is usually simpler than you’d think.
| Problem | Likely cause and fix |
|---|---|
| Sticks to the pan | Not enough oil, or a too light-colored pan, or not cooked long enough. Oil generously next time, try a darker metal pan, make sure the bottom is browned, or use a butter-and-oil combo. Parchment is the surefire fix. |
| Bottom too dark | Move the rack up, lower the temperature by 25°F, or set the pan on a preheated baking sheet to buffer the heat. |
| Dense, flat, not airy | Usually an under-active starter or an under-fermented dough. Make sure your starter is at peak, and give the bulk rise more time next round. |
| Gummy or soupy crumb | The opposite problem: the dough over-fermented. Shorten the bulk rise and watch for that jiggly, bubbly (not slack and soupy) stage. |
| Dimples spring back | The dough is under-proofed or the gluten is tight. Let it rest 20 to 30 minutes, then dimple again. |
| Tough, bready texture | Often too little water or too much flour. Weigh your ingredients, and don’t be afraid of a wet, sticky dough. |
If you want more sourdough projects once you’ve got focaccia down, my sourdough cinnamon rolls use the same starter and are a cozy weekend treat. Sourdough biscuits are a great use for any discard you have. And if you ever find yourself without an active starter but craving fresh bread tonight, my easy no-knead bread uses regular yeast and comes together fast.
Sourdough Focaccia Recipe
Equipment
- 1 9×13 baking pan with sides
- 1 kitchen towel or plastic wrap
Ingredients
sourdough starter
- 100 g sourdough starter active, bubbly (at peak)
- 400 g water room temperature
- 500 g bread flour
- 10 g sea salt fine
- 4 to 5 tablespoons (60 to 75 g) olive oil, divided (for the pan and the top) I use regular rather than extra virgin
- flaky salt for finishing
- fresh rosemary or other toppings of your choice optional
Instructions
Instructions
- In a large bowl, stir the starter into the water until milky. Add the bread flour and fine salt, and mix just until no dry flour remains. Cover and rest 30 minutes.
- After 30 minutes, form the dough into a ball (it will be sticky) then transfer into a lightly oiled bowl and cover again.
- Let rise until grown 50-100% and bubbly, which will be 6 to 14 hours depending on your kitchen temperature. I recommend you put it in the refrigerator overnight to control the temperature and the rise.
- After the rise, add 2 tablespoons olive oil to a 9×13 pan and coat the bottom and sides. Tip the dough in, turn it all over to coat, and gently stretch toward the corners. If it doesn't stretch well, just leave it be and do not force it … it will stretch on its own.
- Cover and let rise until puffy and filling the pan, about 1.5 to 3 hours (warm kitchen) or up to 5 hours (cold kitchen). It's ready when an oiled finger leaves a slow-springing dent.
- Drizzle 2 tablespoons olive oil over the top. Press deep dimples all over with oiled fingertips. Add flaky salt and any toppings.
- Bake in a preheated 425°F oven for 22 to 27 minutes, until deeply golden and crisp at the edges. Cool in the pan 10 minutes, then lift onto a rack.
Nutrition
Notes
- Room temp vs fridge timeline: after the bulk rise, you can refrigerate the dough up to 24 to 48 hours. Bring to room temp, finish the pan rise, then bake.
- Pan scaling: for an 8×8 pan, use about 55 percent of the dough for the same thickness, or the full batch for a thick focaccia with a longer bake.
- Par-bake and freeze: bake to pale golden (about 60 to 75 percent done), cool, wrap, and freeze. Finish from frozen at full temperature until deeply golden.
- Whole wheat swap: replace 10 to 20 percent of the bread flour with whole wheat, adding 2 to 5 percent more water if needed.
- Nutrition: varies by toppings and serving size; use an online calculator for exact values.

Ready to Bake?
That’s the whole thing. No kneading, no shaping, no special gear, just a little patience and a generous hand with the olive oil. Once you’ve made it a time or two, you’ll start playing with toppings and timing until you land on your own house focaccia, and that’s exactly the point. If you make it, I’d love to hear how it went.
Happy baking!
Love,
Jennifer

Tried this recipe?
Tap the stars in the recipe card to leave a quick rating. Your rating helps other home cooks know this recipe works in a real kitchen, not just mine.
And as a thank-you for your feedback, you will receive a free printable copy of my Maker Home Companion Cookbook, featuring my most popular recipes, each one formatted on a SINGLE, easy-to-use page, a perfect kitchen companion for easy meal prep. Click here to learn more about this cookbook and how you can get your copy!
")
")


Meet Jennifer
Jennifer cooks and experiments in the kitchen at Maker Farm, where she focuses on simple pantry cooking, homemade staples, and practical recipes that make everyday meals easier. Over the years she has tested many ways to make cooking simpler and more dependable, and shares the methods that work best in her own kitchen, occasionally showing them on her Heart to Home at Maker Farm vlog.