These sourdough discard biscuits are super soft, flaky, and tall, made from scratch with cold butter, a little optional sour cream, and that jar of sourdough discard you’re not sure what to do with. You stir together one bowl of dry, one bowl of wet, fold the dough just a couple of times, and bake them at 425°F for about 15 minutes. From start to warm biscuit on the plate is around 30 minutes, and they are SO GOOD.

My first few attempts to make these sourdough biscuits tasted great, but they were not the pull-apart, buttery biscuits I had in my head, and I knew I could do better. So I went back and reworked the whole thing, adding sour cream and an egg for richness and dialing in the milk so the dough never gets thirsty. This is that new and improved version, and it is the one Greg kept wandering back to the kitchen for. I brought one to Alexa too, and she said they were wonderful (high praise indeed). I am already planning to make more.


Want to Save This Recipe?
Enter your email below and we’ll send it straight to your inbox! Plus you’ll get new recipes each week!
What is Sourdough Discard, and Why Use it in Biscuits?
If you keep a sourdough starter as I do, you know that every time you feed it, you pour off part of it first so it does not grow into a science experiment. That poured-off part is the discard. It is just flour and water that has fermented, so it is not active and bubbly the way fed starter is, but it still carries a soft tang and a little extra flavor, and I never want to waste it.
Biscuits are one of my favorite places to use my discard! We are not relying on the discard to make these rise, that job belongs to the baking powder and baking soda, so it does not matter if your discard is fresh or has been sitting in the fridge for a week. It just adds a gentle, almost buttermilk-like flavor and a tender crumb. And it means that jar in your fridge becomes breakfast instead of something you have to toss out later, which makes me happy every single time.

The Ingredients You’ll Need
Everything here is pantry-and-fridge basic, nothing fancy. A few of these are worth a quick word so you know why they are in the bowl:
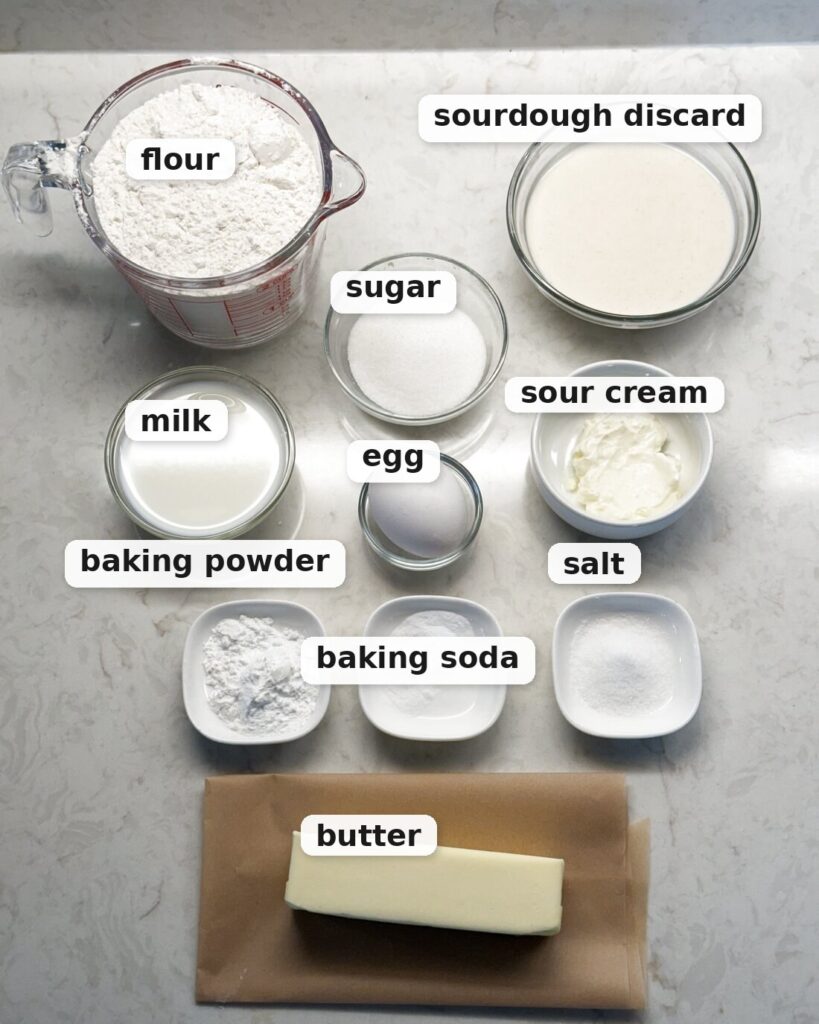
- Sourdough discard, about 3/4 cup (170g): Straight from the jar. Cold or room temperature both work. It brings the tang and tenderness.
- Cold unsalted butter, 8 tablespoons: This is where the flakiness comes from, so we will keep it as cold as we can. I like to grate frozen butter for this – more on this in a second.
- Sour cream, 2 tablespoons: My “secret” fix for too-dry biscuits. It adds fat and a little moisture, which keeps the centers soft. You can leave it out, but they’ll be less tender, less moist, and less rich.
- 1 large egg: For richness and a little structure, so the biscuits hold their height.
- Cold milk, 2 to 5 tablespoons: This is the moisture dial. You add it a tablespoon at a time at the end, just until the dough comes together. Discard varies in thickness, so I never know the exact amount until I am standing there with the bowl.
- Baking powder and a little baking soda: This is the lift. The baking soda also balances the tang of the discard.
Why Grated Frozen Butter Makes Softer Biscuits
Here is the trick that made the biggest difference for me. Instead of cubing the butter, I freeze a stick and grate it on the large holes of a box grater, like I am grating cheese. I grate it straight into the flour and lightly fluff them through with a fork or my fingers.
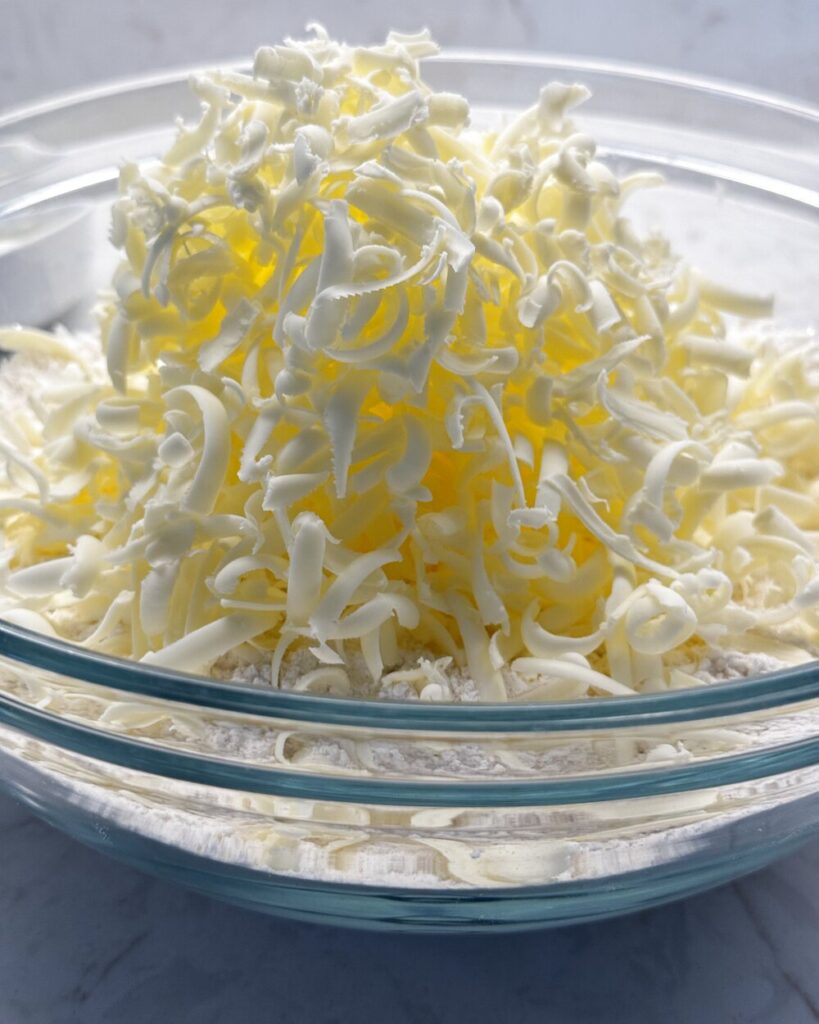
This helps because the butter spreads itself evenly through the flour without me having to rub and squeeze it in, and all that handling is exactly what warms the butter up and makes biscuits dense. With grating, you barely touch the dough, so you keep little shreds and flat bits of butter visible. Those melt in the oven and leave behind the steam pockets that give you those flaky layers.
ONE THING TO WATCH

Grated butter warms up much faster than cubes because there is so much more surface area. So work fairly quickly once it is in the bowl. If it starts looking soft or greasy, just pop the whole bowl in the fridge or freezer for 5 to 10 minutes before you add the wet ingredients. Don’t worry if that happens… a quick chill fixes it completely.
How to Make Sourdough Discard Biscuits
We’re really doing this in two simple stages: getting cold butter into the flour, then bringing it together with the wet ingredients without overworking it. I’ll walk you through it, and I promise it is easier than it looks.
Start by preheating your oven to 425°F and lining a baking sheet with parchment, or very lightly oiling a cast iron skillet if you want soft-sided biscuits (I’ll tell you about the cast iron in a minute). In a large bowl, whisk together the flour, sugar, baking powder, salt, and baking soda so the leavening is evenly spread before any butter goes in.
Add your cold or grated butter and toss it through the flour until you have some pea-sized pieces and some larger, flat bits. Be careful not to work it in completely. Those visible butter pieces are a good thing, not a mistake, so leave them be.
In a separate bowl or measuring cup, stir together the sourdough discard, egg, and sour cream until it is mostly smooth. Pour that into the flour and butter, and gently stir with a fork or spatula just until the dough starts to clump. Now add the cold milk one tablespoon at a time, stopping the moment the dough reaches the right feel. This is the step that saves you from another dry batch, so go slowly here.
What Should the Dough Look and Feel Like?
This is the part I wish someone had spelled out for me before that first dry batch. The dough should be soft, shaggy, and clumpy, not smooth. When you squeeze a handful, it should hold together. It will feel a little tacky in spots, but it should not be wet or sticky enough to coat your hands.

A few dry crumbs left in the bottom of the bowl are completely fine. But if you see a layer of loose flour, or the dough cracks badly when you press it, that is your sign it needs another splash of milk. Add it a tablespoon at a time until it just comes together. Totally normal to need the full 5 tablespoons on a drier day.
Shaping and Cutting
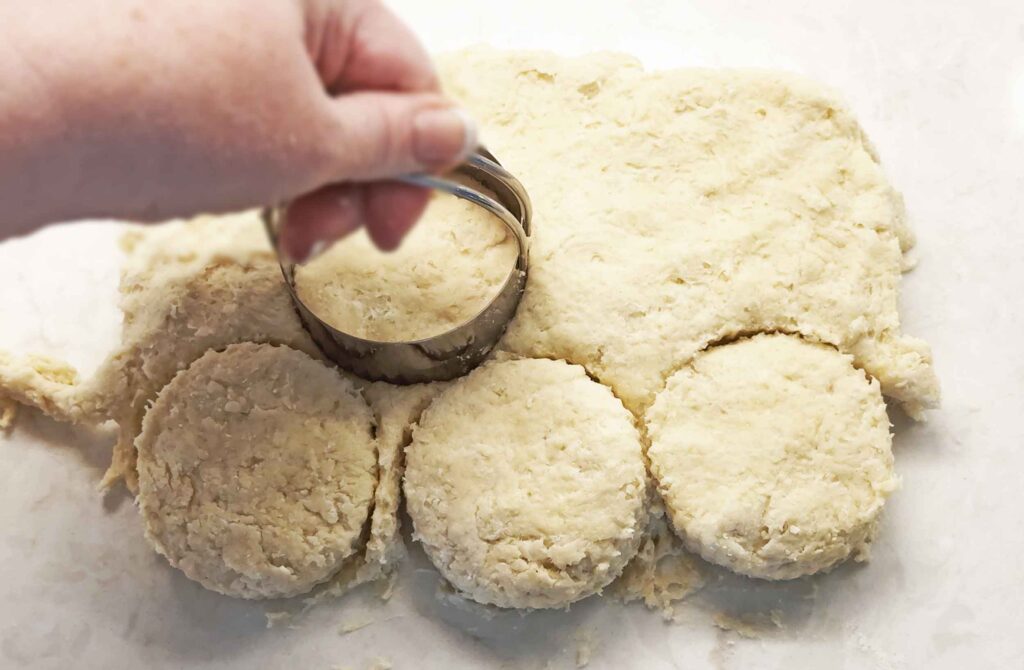
Turn the dough out onto a lightly floured surface and gently press it together with your hands into a rough rectangle. Fold it in half or in thirds, then gently pat it out again. For soft, tender biscuits, do this only one or two times. The folds give you those pull-apart layers, but be careful not to overdo it, because too much folding makes them taller but denser.
Pat the dough to about 1 inch thick. Cut with a sharp biscuit cutter, pressing straight down without twisting. That twist seals the edges and keeps them from rising as tall (ask me how I know). If you would rather not deal with re-rolling scraps, just cut the slab into squares with a sharp knife and skip the waste entirely.
NO BISCUIT CUTTER?

If you don’t have a biscuit cutter, best option is to cut square biscuits with a sharp knife or bench scraper. That’s actually the easiest, least fussy method anyway because there are no scraps to re-roll, which helps keep the biscuits tender.
Place the biscuits so they are touching or almost touching on your pan. This helps because they support each other as they rise, so they go up straight and tall instead of spreading out, and the sides stay soft where they bump together.
For taller biscuits: Pat the dough to a full 1 inch thick, cut straight down without twisting, and place the biscuits touching or nearly touching. The dough should be soft and slightly tacky but firm enough that the cut biscuits hold their shape. If they slump or spread before baking, gently work in a small amount of flour. Make sure your baking powder is fresh, since old baking powder can cause flat biscuits.
Baking and Knowing When They’re Done
Bake at 425°F for 14 to 17 minutes, until the tops are golden and the centers are baked through. I started checking mine around 13 minutes, because every oven runs a little differently and I would always rather peek early.
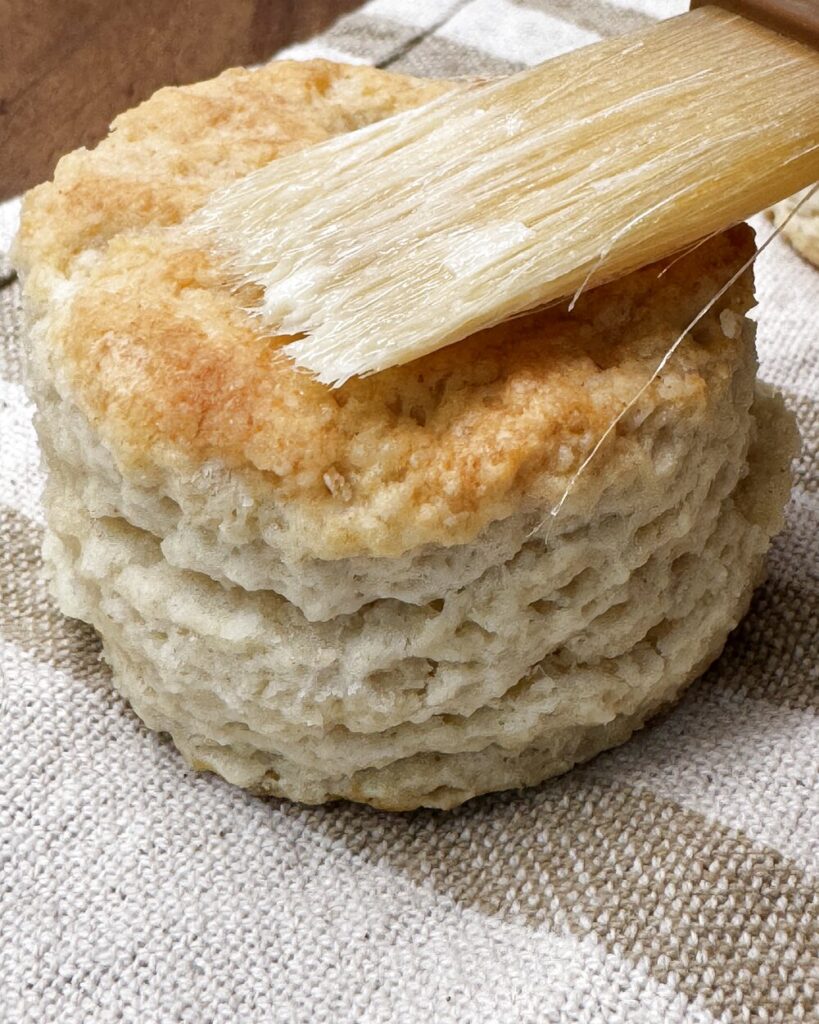
To be sure they are done, gently tap the top of the center biscuit. It should feel set, not squishy. You can also lift one biscuit’s edge with a spatula and take a quick look underneath. The bottom should be lightly golden, not pale and wet-looking. As soon as they come out, brush the warm tops with melted butter. For extra-soft tops and sides, lay a clean kitchen towel loosely over them for 5 to 10 minutes. The trapped steam softens everything beautifully.

Want to Bake Them in Cast Iron?
I made my favorite batch in a 10-inch cast iron skillet instead of on a baking sheet, and I love what it does. The biscuits bake up with soft sides where they touch and a lovely golden bottom. Just lightly oil the skillet first and nestle the biscuits in so they are snug against each other.

The one thing to know about cast iron is that it holds heat and keeps cooking even after it leaves the oven. So I let mine rest in the pan for just 2 to 3 minutes, then moved them out. Be careful not to leave them sitting in the hot skillet too long, or the bottoms can go from golden to too dark.
How Do I Keep My Biscuits Soft and Not Dry?
Since I learned this the hard way, let me save you the trouble. Dry, hard biscuits almost always come down to three things, and all three are easy to avoid.
First, do not skimp on the milk. The dough should look shaggy and feel slightly tacky, never dusty or crumbly, so add milk a tablespoon at a time until it gets there.
Second, keep your handling light. The grated frozen butter and the gentle one-or-two folds are what keep them tender, so resist the urge to knead.
Third, do not overbake. Pull them the moment the centers are set and the tops are just golden, because a couple of extra minutes is the difference between soft and dry. And that finishing brush of butter under a towel is the little step that keeps the tops pillowy instead of crusty.
How to Store, Freeze, and Reheat
These are best the day you bake them, warm and fresh, but they keep nicely. Once they are completely cool, store them in an airtight container at room temperature for up to 2 days. I tuck a paper towel in with them to catch any extra moisture so they do not get gummy.
To freeze baked biscuits, let them cool fully, then seal them in a freezer bag for up to 3 months. You can also freeze them unbaked: cut the biscuits, freeze them solid on a tray, then bag them, and bake straight from frozen with a couple of extra minutes added.
To reheat and bring back that just-baked softness, warm a biscuit in a 300°F oven for about 5 to 8 minutes, or 10 to 12 if it is frozen. A quick zap in the microwave works in a pinch, but be careful not to go more than 15 to 20 seconds, because the microwave can turn a soft biscuit rubbery fast.
Make-Ahead Tips and What to Serve Them With
If you want fresh biscuits without the morning work, the freeze-the-unbaked-rounds method above is my favorite. You can also mix the dry ingredients and grate the butter into them the night before, then keep that bowl covered in the fridge and just stir in the wet ingredients when you are ready.
As for serving, we are big fans of them split and slathered with butter and honey while they are still warm. They are wonderful with a smear of jam at breakfast, tucked alongside a piece of breakfast casserole, or used to mop up sausage gravy on a slow Sunday. Greg likes his with butter and honey as breakfast the day after I make them, which is how I knew this recipe was a keeper.
Frequently Asked Questions
Do I need active, bubbly starter, or is cold discard fine?
Cold discard straight from the fridge is perfectly fine. The baking powder and baking soda do all the rising here, so the discard is just for flavor and tenderness. No need to feed or wake anything up.
No Sourdough Discard?

You can still make these biscuits, but they will not have the same sourdough flavor. Replace the 3/4 cup discard with 1/2 cup milk plus 1/4 cup sour cream or plain yogurt. Or use 3/4 cup milk mixed with 1 teaspoon lemon juice or vinegar. Add the liquid gradually and stop when the dough is soft, shaggy, and slightly tacky.
Or… make a sourdough starter so you get discard! It’s easy and only requires two ingredients: flour and water.
Can I use cold cubed butter instead of grating frozen butter?
Yes, you can. Cut very cold butter into small cubes and work it into the flour until you have pea-sized pieces and some flat bits. Grating just makes it easier to keep the butter cold and evenly spread with less handling, which is why I lean on it, but cubes will still give you good biscuits.
Why did my biscuits turn out dense?
Usually it is too much handling or too much folding. Every extra press warms the butter and works the flour, and that makes them heavy. Keep the butter cold, fold only once or twice, and stop as soon as the dough holds together.
Why did my biscuits turn out flat?
The most likely causes are:
- The dough was patted too thin before cutting.
- The dough was too wet or soft.
- The baking powder was old or weak.
- The cutter was twisted, sealing the edges.
- The biscuits were spaced apart rather than touching.
- The discard was unusually thin, changing the dough consistency.
Can I make these without an egg or sour cream?
The egg and sour cream are what fixed my dry batch, so I would not skip both unless you are okay with drier biscuits. In a pinch you can swap the sour cream for plain Greek yogurt, which works the same way. If you leave out the sour cream and egg, you will need a little extra milk to bring the dough together.
Baking sheet or cast iron, which should I use?
Both work well. A parchment-lined baking sheet gives you slightly crisper, more separate sides, while a cast iron skillet gives you soft sides and a deeply golden bottom. If you use cast iron, just move the biscuits out after a few minutes so the bottoms do not keep cooking.

Sourdough Discard Biscuits Recipe
Equipment
- 1 baking sheet or cast iron skillet
Ingredients
Ingredients
- 2 cups all-purpose flour spooned and leveled, plus more for shaping
- 2 tablespoons sugar
- 1 tablespoon baking powder
- 3/4 teaspoon fine salt
- 1/4 teaspoon baking soda
- 8 tablespoons cold unsalted butter cut into small cubes or grated from frozen
- 3/4 cup sourdough discard about 170g
- 1 large egg
- 2 tablespoons sour cream
- 2 to 5 tablespoons cold milk as needed
- 1 to 2 tablespoons melted butter for brushing after baking
Instructions
Instructions
- Preheat the oven to 425°F. Line a baking sheet with parchment paper, or very lightly oil a 10-inch cast iron skillet.
- In a large bowl, whisk together the flour, sugar, baking powder, salt, and baking soda.
- Add the cold butter. Cut or toss it into the flour with your fingers, a pastry cutter, or two forks until the mixture has some pea-sized pieces and some larger flat bits. Do not work it in completely; visible butter pieces are good. (For the softest biscuits, grate frozen butter on the large holes of a box grater, toss it through quickly, and chill the bowl 5 to 10 minutes if it softens.)
- In a separate bowl, stir together the sourdough discard, egg, and sour cream until mostly smooth.
- Pour the discard mixture into the flour mixture. Gently stir with a fork or spatula until the dough starts to clump together.
- Add cold milk 1 tablespoon at a time, just until the dough is soft, shaggy, and holds together when squeezed. It should feel slightly tacky but not wet. A few dry crumbs in the bowl are fine.
- Turn the dough out onto a lightly floured surface. Gently press it into a rough rectangle. Fold it in half or in thirds, then gently pat it out again. Do this only once or twice for soft biscuits.
- Pat the dough to about 1 inch thick. Cut with a sharp biscuit cutter, pressing straight down without twisting, or cut into squares with a sharp knife to avoid scraps.
- Place the biscuits touching or almost touching on the prepared pan so they rise straight with soft sides.
- Bake for 14 to 17 minutes, until the tops are golden and the centers are set. Tap the center biscuit to check that it feels set, not squishy, and that the bottom is lightly golden.
- Brush the warm biscuits with melted butter right after baking. For extra-soft tops, loosely cover with a clean kitchen towel for 5 to 10 minutes. If using cast iron, move the biscuits out of the pan after 2 to 3 minutes.
Nutrition
Notes

If you have a jar of discard hanging out in your fridge, this is the recipe I want you to try first. They come together fast, they fill the kitchen with that warm, buttery smell, and they disappear even faster (especially with a Greg around). Let me know how yours turn out, and what you ended up slathering on top.
Happy baking!
Love,
Jennifer
Tried this recipe?
Tap the stars in the recipe card to leave a quick rating. Your rating helps other home cooks know this recipe works in a real kitchen, not just mine.
And as a thank-you for your feedback, you will receive a free printable copy of my Maker Home Companion Cookbook, featuring my most popular recipes, each one formatted on a SINGLE, easy-to-use page, a perfect kitchen companion for easy meal prep. Click here to learn more about this cookbook and how you can get your copy!
")
")


Meet Jennifer
Jennifer cooks and experiments in the kitchen at Maker Farm, where she focuses on simple pantry cooking, homemade staples, and practical recipes that make everyday meals easier. Over the years she has tested many ways to make cooking simpler and more dependable, and shares the methods that work best in her own kitchen, occasionally showing them on her Heart to Home at Maker Farm vlog.
so soft
Tasted soo good but they were too flat to cut in half to put jelly on. Same results both times I made. Followed the directions even putting in freezer while I made the wet ingredients so buttershsbing mix would not melt.
I’m so glad you liked the flavor, but I’m sorry they didn’t rise tall enough to split. They should definitely be tall enough for jelly. Since you kept the butter cold and had the same result twice, I’d love to help troubleshoot.
Was your sourdough discard fairly thin and pourable, or thick like pancake batter? Also, did you pat the dough to a full 1 inch thick and place the biscuits touching or very close together in the pan? Very thin discard or dough that is a little too wet can cause the biscuits to spread instead of rising upward. It’s also worth checking that the baking powder is fresh.
Thank you for letting me know, because I’m going to make the dough-consistency and thickness cues even clearer in the recipe.