Homemade Butter
Servings 16
Equipment
- 1 Mason Jar
- 1 Jar-Based Butter Churn optional
- 1 Storage container or butter crock
- 1 Mesh strainer or cheesecloth optional if you want to keep the buttermilk
Ingredients
- 2 cups heavy whipping cream at room temperature
- cold water for rinsing
- 1/4 teaspoon salt optional, to taste
Instructions
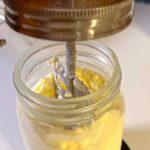
- Step 1. Start with the CreamPour room temperature heavy whipping cream into your chosen equipment (mason jar, filling halfway, or butter churn). Seal the mason jar tightly or secure the lid and dasher on the butter churn.
- Step 2: Shake or Churn ItShake the mason jar vigorously or move the dasher up and down rhythmically until the cream separates into solid butter and liquid buttermilk. This typically takes 10-30 minutes. You'll be able to tell its done when the cream separates into solid yellow clumps (the butter) and a milky liquid (the buttermilk), with the butter clinging to the sides of the jar, often after passing through a whipped cream stage. Stop shaking or churning immediately once you see this distinct separation.
- Step 3: Drain the ButtermilkOnce separated, drain the buttermilk out of the butter. You can optionally drain it through a fine mesh strainer into a bowl and reserve the buttermilk for other recipes.
- Step 4: Rinse the ButterRinse the butter thoroughly under cold water, gently pressing and kneading it, until the water runs completely clear. This removes any remaining buttermilk and helps the butter last longer. You want to get off all the whey from the buttermilk so it stores well.
- Step 5: Add Salt (Optional)If desired, knead in salt to taste.
- Step 6: Store Your ButterPress the finished butter into a storage container or butter crock. Or just wash out your Mason jar and put it back in there. Store homemade butter covered in the refrigerator for a few weeks, or freeze for up to six months.
